
Help · Grid & Level Guard
Grid & Level Guard user manual
How to record your approved grids and levels as a baseline, scan for changes, and accept or reject what moved. New here? Start with the Quick start. To install it and sign in, see Installing and licensing BA.TIVA Revit plugins.
Introduction
BA.TIVA Grid & Level Guard warns you when someone changes the approved grids and levels in a Revit project, before the change spreads into coordination and construction problems.
You record the approved grids and levels once, as a baseline stored inside the project. From then on, Scan Model compares the current model with that baseline using 12 checks and a fixed 1 mm tolerance. Every grid and level gets a status, and Select in Revit takes you straight to anything that moved.
Who it is for: BIM Managers, BIM Coordinators and project architects or engineers who own a project's datum (its grids and levels).
It never changes your model. Grid & Level Guard never moves, renames, deletes, pins or repairs grids, levels or any other element. The only thing it writes is its own baseline record, and only after you confirm.
Grid & Level Guard is product RVT-001, tool 001 in the BA.TIVA Revit Tools family. For system requirements, installing, signing in and your licence, see Installing and licensing BA.TIVA Revit plugins.
Quick start
Five steps take you from a fresh install to your first scan. Try it on a copy of a project first.
- Open a Revit project whose grids and levels are approved. Family documents are not checked.
- Open the panel. On the BA.TIVA ribbon tab, click Grid & Level Guard. The panel opens docked on the right of the Revit window. You can move, float or dock it like any Revit panel.
- Sign in and start your trial in the licence bar at the top of the panel (first time only, see Licensing).
- Click Establish Baseline, check the summary, confirm, then save the project. In a workshared project, also synchronise with central so your team gets the baseline.
- Click Scan Model whenever you want to check for changes. Click a row to see what changed, and Select in Revit to find it.
If you are unsure what to do, read Next step under the buttons. It always says what to do in the current situation.
The panel at a glance
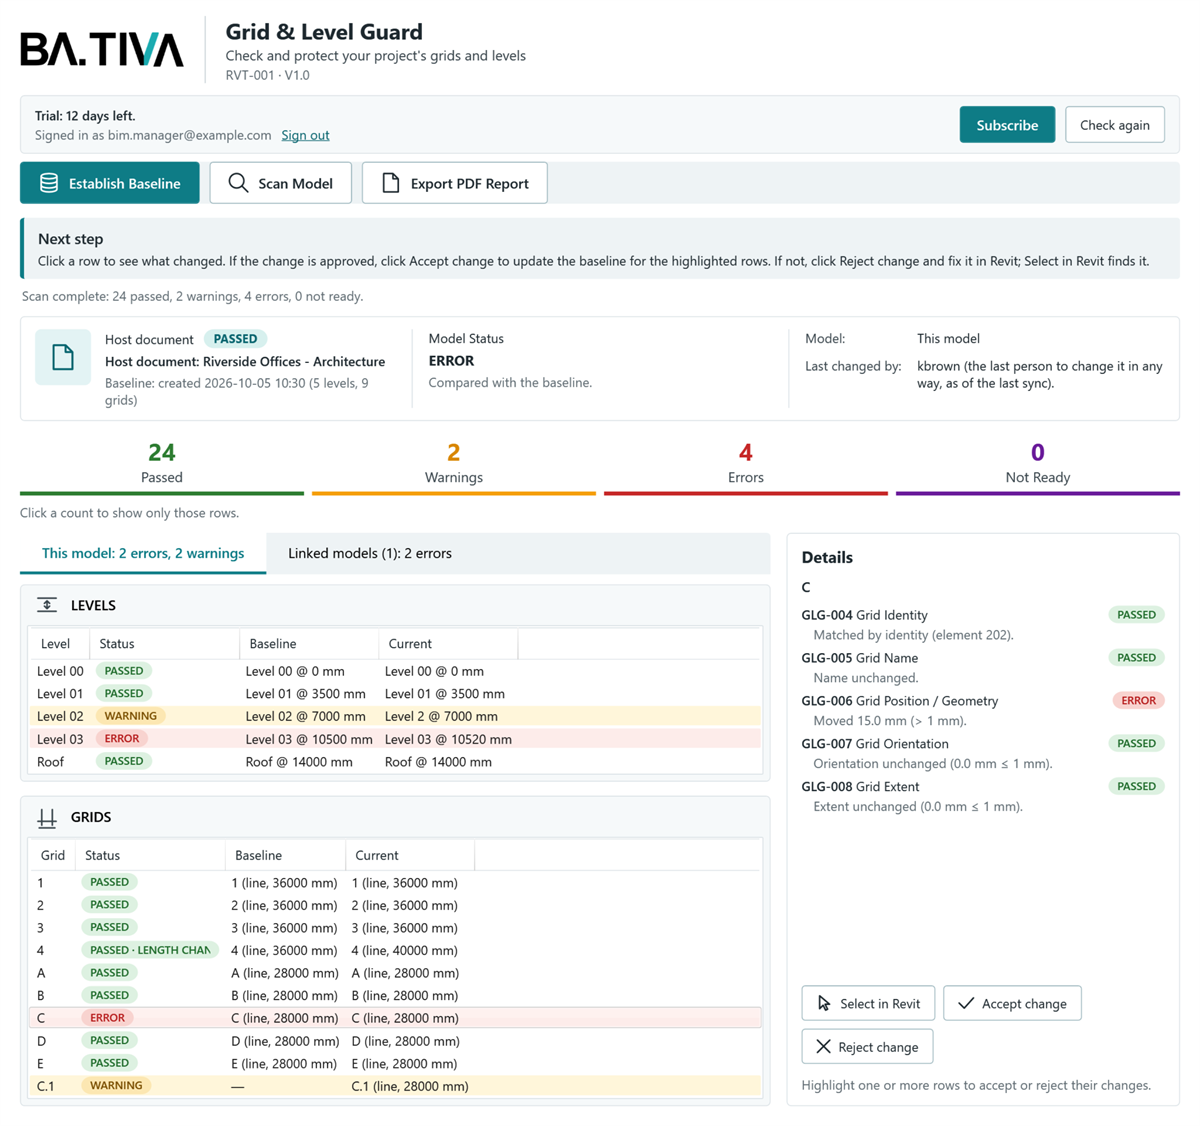
| Area | What it shows |
|---|---|
| Header | Product name and version: RVT-001 · V1.0 |
| Licence bar | Your licence state, one button (for example Subscribe), Check again, your account and Sign out |
| Action buttons | Establish Baseline, Scan Model, Export PDF Report |
| Next step | What to do now, followed by the result of your last action |
| Status card | Host document (the open project), the Baseline line (when it was created, and how many levels and grids), Model Status (the overall result), and for the clicked row its Model and Last changed by |
| Counts | Passed, Warnings, Errors, Not Ready. Click a count to show only those rows; click it again to show all. |
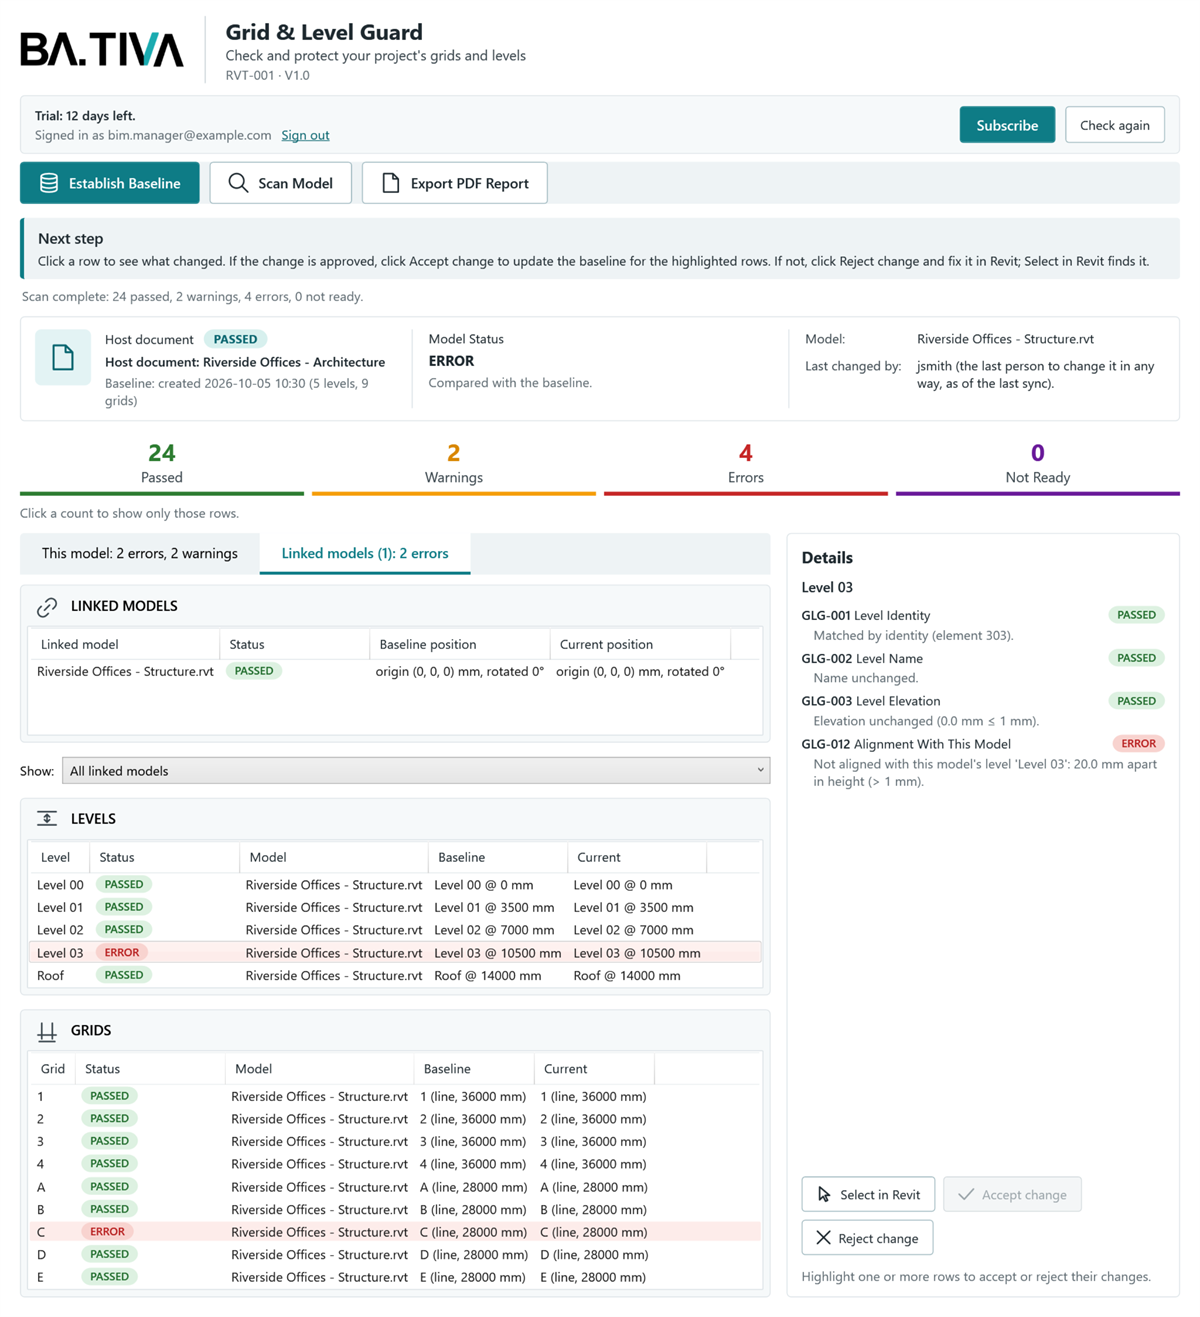
| Tabs | This model (its levels and grids) and Linked models (each link, and its levels and grids). Each tab name shows its own error and warning count. |
| Details card | Each check's result for the clicked row, with Select in Revit, Accept change and Reject change |
On a wide panel the Details card sits to the right of the tables. On a narrow one it moves below them.
Using Grid & Level Guard
The work is a loop: establish the baseline once, scan whenever you like, then accept approved changes into the baseline or reject the rest to be fixed in Revit.
Scanning never changes anything. Only Accept change moves the baseline, and either choice is kept only once you save.
1. Establish the baseline
Do this once, when the project's grids and levels are approved.
- Click Establish Baseline.
- Revit shows Store n levels and n grids as the baseline? with a list of every level (name and elevation) and grid (name, shape and length).
- Click Establish baseline to confirm, or Cancel.
- Save the project. In a workshared project, synchronise with central as well. The panel reminds you: Baseline established: … Save the project to keep it.
The baseline also records every loaded Revit link and its grids and levels. Nested links are not recorded.
Replacing a baseline. If the project already has one, a second dialog, Replace baseline, names its creation date. Cancel is the default. A replaced baseline can't be recovered, so to approve a few changes use Accept change instead.
2. Scan the model
Click Scan Model at any time. The scan only reads the model, and the panel reports Scan complete: n passed, n warnings, n errors, n not ready.
- Model Status shows the overall result: the worst status of any row.
- The counts (Passed, Warnings, Errors, Not Ready) count each grid and level once. Click a count to show only those rows; click it again to show all.
- This model lists the project's levels and grids, each with its Status, its Baseline value and its Current value, for example
Level 02 @ 3000 mm→Level 2 @ 3000 mm. - Linked models lists each link, then its levels and grids. Use Show: to pick one link, or click the link's row.
Results are a snapshot. Scan again after editing grids or levels. Switching to or closing another project clears the results.
3. Review a row
Click a row. The Details card lists each check that applies (GLG-001 to GLG-012) with its status and a plain reason, for example Elevation changed by 15.0 mm (> 1 mm). The status card shows the row's Model and Last changed by, and Details shows when and by whom it was last accepted or rejected.
Last changed by comes from Revit worksharing. It is available only in workshared projects, shows the last change of any kind (not only to the datum), updates when someone synchronises, and has no date.
4. Find it in Revit
Highlight one or more rows (Ctrl+click or Shift+click to highlight several), then click Select in Revit. With no rows highlighted, it selects every affected grid and level that still exists.
Revit selects the elements, switches to a view that shows them and zooms in. Elements in a linked model are selected through the link. Investigate and fix them with Revit's own tools. Deleted elements can't be selected, and the panel says how many. If Revit finds no view that shows them, they are still selected and the panel says so.
5. Accept or reject the change
Highlight the WARNING or ERROR rows you have reviewed, then choose:
- Accept change when the change is approved. A dialog lists every change, with Cancel as the default. Confirm, then save the project. Only those grids and levels are updated in the baseline, and each change is added to the accept history with your name and the time.
- Reject change when it is not approved. There is no dialog: the rows are marked REJECTED (for example
ERROR · REJECTED) with your name and the time. Save the project. Then fix the element by hand in Revit. Once it matches the baseline again, the next scan shows PASSED and the rejection clears.
Neither button ever changes a grid or level. Rejections and the accept history are saved with the baseline, so the whole team sees them after you synchronise.
Accept change also works on:
- a grid shown as PASSED · LENGTH CHANGED, to make its new length the reference (see Understanding the results);
- an added grid or level, to add it to the baseline, or a deleted one, to remove it;
- a link row, to accept its new position, start tracking a new link, or stop tracking a removed one.
To make the whole current model the reference, use Establish Baseline and replace the baseline instead.
6. Export a PDF report
After a scan, click Export PDF Report, choose where to save it, and the report opens. The suggested name is Grid & Level Guard - <project> - <date> <time>.pdf.
The report has the project, scan time and baseline date, the Model Status, a summary by model, the linked models, every flagged grid and level with its problem and last editor, the accept history, and a key to the statuses. Passed grids and levels are counted, not listed.
Working in a team (workshared projects)
- Save and synchronise after establishing, accepting or rejecting, so others get the change.
- The baseline lives in one element in the project. If someone else is editing it, the panel says Another user is editing the baseline storage element. Ask them to synchronise and relinquish it, then try again.
- Every baseline change is a normal Revit transaction named BA.TIVA Grid & Level Guard: …, so it appears in Revit's Undo list.
Understanding the results
Every grid, level and link gets one of five statuses, and anything more than 1 mm from the baseline counts as changed. The tolerance is fixed.
Statuses
| Status | Colour | Meaning | What to do |
|---|---|---|---|
| ERROR | Red | Moved, rotated, slid, deleted, or out of line with this model by more than 1 mm | Investigate. Accept if approved, otherwise reject and fix in Revit. |
| WARNING | Amber | Renamed, or added since the baseline | Accept if approved, otherwise reject and fix. |
| NOT READY | Purple | Couldn't be checked safely, for example no baseline, an unreadable baseline, an unloaded link or an unsupported grid shape | Read the reason in Details or Model Status. |
| PASSED | Green | Matches the baseline within 1 mm | Nothing |
| NOT CHECKED | Grey | Not checked yet, or skipped because an earlier check failed | Scan, or fix the earlier check first. |
A row's status is its worst check result, in the order ERROR, NOT READY, WARNING, PASSED. The status always shows as text, so colour is never the only signal.
REJECTED after a status (for example ERROR · REJECTED) means someone rejected the change. The row stays flagged until the element is fixed in Revit.
PASSED · LENGTH CHANGED means a grid is longer or shorter than in the baseline. Lengthening or shortening is never reported as a problem. If you keep the new length, accept it, so a later slide along the grid line is measured from the new ends.
The checks
| Check | Name | Reports | Status |
|---|---|---|---|
| GLG-001 | Level Identity | A baseline level was deleted (or deleted and recreated) | ERROR; NOT READY if the match is ambiguous |
| GLG-002 | Level Name | A level was renamed, including case or spacing changes | WARNING |
| GLG-003 | Level Elevation | The elevation changed by more than 1 mm | ERROR |
| GLG-004 | Grid Identity | A baseline grid was deleted (or deleted and recreated) | ERROR; NOT READY if the match is ambiguous |
| GLG-005 | Grid Name | A grid was renamed, including case or spacing changes | WARNING |
| GLG-006 | Grid Position | A grid moved sideways, or an arc grid's centre or radius changed, by more than 1 mm | ERROR |
| GLG-007 | Grid Orientation | A grid rotated enough to move its ends more than 1 mm | ERROR |
| GLG-008 | Grid Extent | A grid slid along its own line by more than 1 mm | ERROR |
| GLG-009 | Added Since Baseline | A grid or level that isn't in the baseline | WARNING |
| GLG-010 | Link Presence | A baselined link was removed (ERROR), is unloaded (NOT READY), or a new link appeared (WARNING) | as stated |
| GLG-011 | Link Position | A linked model was moved or rotated by more than 1 mm | ERROR |
| GLG-012 | Alignment With This Model | A link grid or level is more than 1 mm from this model's grid or level of the same name | ERROR |
Good to know
- Grids and levels are matched by their Revit identity, never by name. A grid deleted and redrawn with the same name is a new element: the old one shows as missing (ERROR), and Details names the look-alike as a possible replacement.
- One change is reported once. A rotation shows only under GLG-007, a sideways shift only under GLG-006, and moving a whole link only under GLG-011.
- Flipping a grid (swapping its ends, which moves the bubble) is not a change.
- Not checked: per-view 2D extents, bubble visibility, leaders and elbows, 3D extents, and moving the Project Base Point, Survey Point or shared coordinates.
- Linked models are compared in their own coordinates. GLG-012 compares link grids and levels with this model's grids and levels as they are now, matched by exact name. An alignment error is not a baseline change, so it can be rejected but not accepted.
- Multi-segment grids: each segment is checked as a grid of its own.
- Curved grids are checked with their true arc, not a straight-line approximation.
The baseline in your project
The baseline is stored inside the Revit project itself, so it travels with the file and there is nothing else to manage. Grid & Level Guard has no settings: the 1 mm tolerance and the checks are the same for everyone.
- What it holds: each grid's and level's identity, name, elevation or geometry; each loaded link's position and its grids and levels; the rejections; and the accept history, with who and when.
- Where it is: one BA.TIVA data element in the project. It is not a grid, level or view, and it changes nothing you see in the model.
- When it is kept: only when you save the project (and synchronise, if workshared). Close without saving and the change is lost.
- Copies: a copy of the project made with Save As carries the baseline with it.
- Team members without Grid & Level Guard can open and work on the project as normal.
- Uninstalling or an ended licence never removes or changes a baseline. Reinstall or renew and it is there.
- A baseline that can't be read shows NOT READY with the reason. Click Establish Baseline to replace it with the current grids and levels.
Troubleshooting
Most problems are explained in the panel itself: read Next step and the line under it first.
Common problems
| Problem or message | Fix |
|---|---|
| Installing, signing in or a licence message | See Installing and licensing BA.TIVA Revit plugins. |
| The buttons are greyed out | The licence bar says why. Accept and Reject need highlighted WARNING or ERROR rows. Select in Revit and Export PDF Report need a scan first. |
| No active document. Open a Revit project. | Open a project. Family documents are not checked. |
| This project has no baseline yet. | Click Establish Baseline once the grids and levels are approved. |
| The project is read-only, so the baseline can't be stored. | Reopen the project with write access, or save a copy you can edit. |
| Another user is editing the baseline storage element. | Ask them to synchronise and relinquish, then try again. |
| The active project changed. Scan again … or The results belong to another project. | You switched projects since the scan. Click Scan Model again. |
| Nothing to reject: the highlighted rows have changed since the scan. | Someone changed them after your scan. Scan again and review. |
| A grid or level redrawn with the same name shows ERROR | It is a new element. Highlight both rows and click Accept change: the deleted one leaves the baseline and the new one joins it. |
| Last changed by says Not available | The project is not workshared. |
Frequently asked questions
Does it ever change my model? No. It reads grids, levels and links, and selects elements. It writes only its own baseline, after you confirm.
Does it send my model anywhere? No. Only licence details go to BA.TIVA.
Can I change the 1 mm tolerance? No. It is fixed in V1.0 so every project is checked the same way.
Can it put a moved grid back? No. Use Select in Revit to find it, fix it with Revit's tools, then scan again.
Does it check other categories? No. Only grids and levels, in the project and its links.